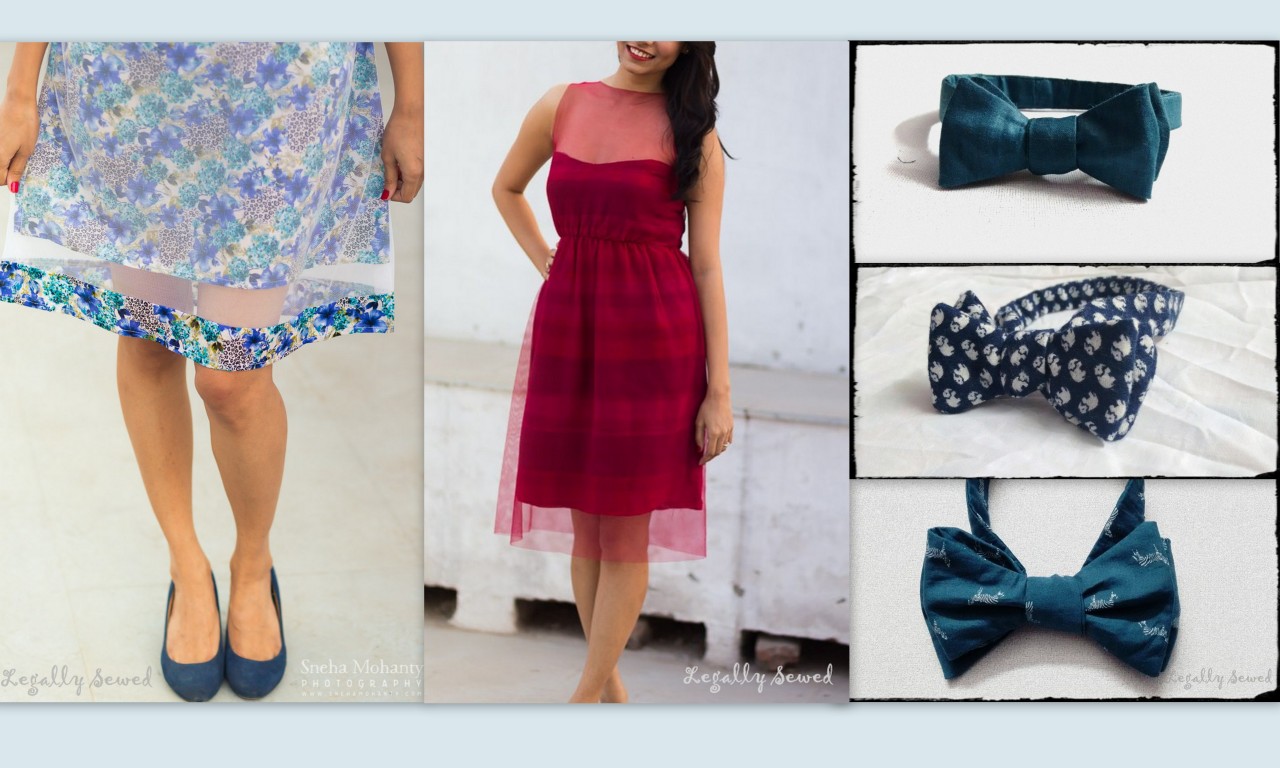
Yes, I admit I am a bowtie addict! I love making bow ties! All kinds. This post is a photo blog dedicated to all the bowties I have made and those that I will make in the future. Here it goes…


Hope you enjoyed the show. 🙂
Yes, I admit I am a bowtie addict! I love making bow ties! All kinds. This post is a photo blog dedicated to all the bowties I have made and those that I will make in the future. Here it goes…
Hope you enjoyed the show. 🙂
The summers are on their way. With temperatures rising, this is the perfect time for you to get pretty summer dresses and the perfect time for us to introduce our blue aztec print maxi dress!


Size: Small (8 UK size)
Fabric: Soft cotton
Photo credits: Sneha Mohanty Photography
It was a treat working on this one. I loved the aztec print and the fabric. I picked up this fabric from a fabric market in Delhi and imagine my surprise when i walked into H&M and found the exact same fabric with the same print! Don’t believe me? Here I took a picture of it at the store.

They had used this fabric to make a halter type dress. Obviously, I wouldn’t copy it! Thankfully, I had bought a lot of fabric from that same place so i got a of ‘H&M’ good quality fabric for my clothes. Couldn’t be more excited!
To order this design or for any enquiries, you can e-mail at kanikakadam.official@gmail.com. Do let us know what you think of this dress irrespective. Would love to read your comments. Till then peace out.
#maxidress #maxi #aztecprint #summerdress #iloveblue #fashion
Today I will be presenting to you a three in one DIY beach cover up/top/dress. Yes, it can be all three things! This is a part of our ‘Recycled Clothes’ initiative and can be easily made with a colourful chiffon dupatta.
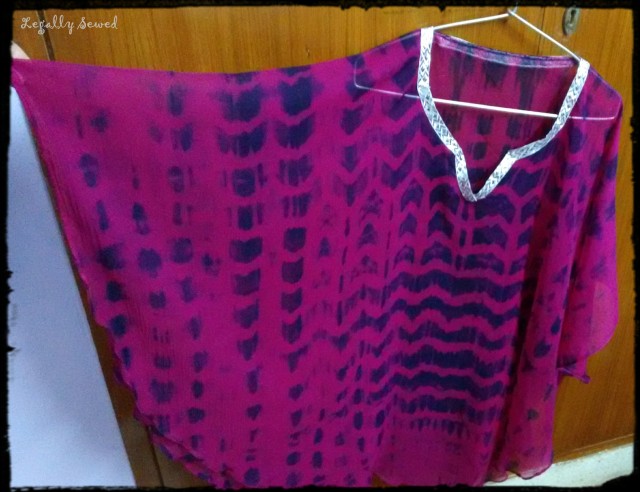


So you can wear this as any of the following depending on your mood.
So here’s how you can make it. I have added a few pictures below to help you with the process. Fold your dupatta in half and cut a U shape. Hem the edges and cut out the neck in the middle. Choose whatever shape you want for the neck and just hem that too. Add any embellishments you want and you are done! So easy right?? Well, to be fair, hemming chiffon is not so easy. A lot of people use a rolling foot. I don’t own and have never used a rolling foot. So let me tell you the way I do it. I feel it is easiest to roll up the edge between your index finger and thumb as you go and do a zig zag stitch on it. If it doesn’t end up being very neat, you can just add a border.


So apart from the hemming, this is very easy to make and looks great! You can make lots and lots of variations of it! You can add pom poms at the bottom or add a nice border to the neckline or spread over some tiny round mirrors or some sequins all over, make different types of necklines, whatever you want!
Not equipped to do this on your own? If you live in Delhi, send us your dupatta and we will make this amazing beach cover up/top/dress for you at a very reasonable cost. No dupattas or any big enough cloth in the house? No worries, we can make this for you in a new cloth as well. For orders, enquiries or feedback, e-mail at legallysewed@gmail.com or comment here.
If you have been inspired by our ‘Recycled Clothes’ initiative and have recycled any of your clothes, send us pictures and we will upload the best ones on our blog! Waiting for your mails! 🙂
#recycledclothesinitiativebylegallysewed #recycledclothes #beachcover #top #dress #DIY #sewingtutorial
Hi guys! As promised, I am bringing you more pretty recycled clothes to inspire you to be a part of our ‘Recycled Clothes’ initiative. So here it goes… My orange pleated skirt! I wore it for a brunch and for a visa interview. I love how bright it looks!

This orange pleated skirt has been made using my mom’s old dupattas. Yes, again from old dupattas. Old dupattas are awesome to make new clothes since they provide a long piece of uncut fabric to work with. The only problem is that a lot of dupattas are thin and see through. But you can either buy lining separately or you can use two layers of a semi see through dupattas as lining. For this skirt, since the dupatta was a bit see through, I had to fold the dupatta twice and use two layers of it on each side for the lining. The second dupatta was see through as well but it worked perfectly as the pleated fabric for my skirt and there was enough of it left over to make my waistband.
After i was done with the skirt, I took a lot of crazy photos. I was just trying out different filters on my phone for my photographs and that’s when i found this! (see below) White looks beautiful, no? I wish I had same dupattas in white to make this skirt. But it’s ok. It turned out great.

Here is a close up of the skirt if you would like to see. I added tic tac fasteners on the waistband becuase that was the only thing available with me at the time. I would have preferred the big broad hooks or a zip.

Inspired enough?? Send us photos of your old clothes and we will help you out with ideas on how to transform them!
Ofcourse just like our other designs, this design can also be ordered in different prints/colours to be made out of new cloth.
For orders, enquiries or feedback, please e-mail at legallysewed@gmail.com.
If you like our work and wish to be a part of our ‘Recycled Clothes’ initiative, do not forget to like our blog, like our facebook page (Kanika Kadam) and our instagram account (#kanikakadam_official)! Send us photographs of clothes which you have recycled on your own and we will feature the best DIYs on our blog! Share the love.
#recycledclothesinitiativebylegallysewed #legallysewed #recycledclothes #environmentfriendlyinitiative #pleatedskirt #skirt

Introducing ‘RECYCLED CLOTHES’… an environment friendly initiative by Kanika Kadam.
What comes to mind when you think of recycled clothes? Definitely not this gorgeous red dress!


We thought it was time to change how people think of recycled clothes. Recycled clothes can be beautiful. All you need is some of your old clothes and turn them into pretty fashionable items. I am sure quite a lot of you have cupboards full of old dupattas and clothes, slightly torn tank tops, clothes that bore you now or some favourite clothes that are too small now but you just can’t throw away. Most of us throw away and waste a lot of these clothes and keep buying new ones. Most of these end up in landfills and contribute towards polluting the environment.
What if there was a way to redeem and recycle these clothes? Do a bit for our environment? This was the idea behind starting ‘Recycled Clothes’ initiative. Legally Sewed is doing its bit for the environment by starting ‘Recycled Clothes… an environment friendly initiative’. We have been and will be making lovely and interesting clothes from old clothes. We thought this was one of the best ways to showcase our designs as well. The lovely red/maroon dress you see is one such recycled clothing under this initiative. It has been made only using my mom’s old dupattas! When recycled clothes can look this awesome, why won’t anyone want them!?

Now, are you ready to do your bit for the environment? Even if you don’t care about the environment too much, don’t you want to preserve that favourite dress of yours? Does it hold too much sentimental value? Use parts of the old cloth, combine it with some new cloth and make a new favourite. There are limitless possibilities to what you can make with your old clothes! We will keep posting the outfits made from old clothes to inspire you and share some great ideas for you!
So here’s what you can do to be a part of this initiative. If you would like to make something out of your old clothes, send us a picture of the cloth, the approx. size of the cloth, type of fabric etc. and we can brainstorm the possibilities with you. We understand that some of you may feel you do not have the skill or the time to recycle your own clothes (creatively challenged and too busy as they say) so if you live in Delhi, you can send us the cloth and we can recycle it for you by turning it into a pretty piece for you to wear at a reasonable charge for the designing and stitching. Sounds great, right?

Ofcourse just like our other designs, the designs we put up under our ‘Recycled Clothes’ initiative can be ordered in different prints/colours to be made out of new cloth.
For orders, enquiries or feedback, please e-mail at legallysewed@gmail.com.
If you like our work and wish to be a part of our ‘Recycled Clothes’ initiative, do not forget to like our blog, like our facebook page (Kanika Kadam) and our instagram account (#kanikakadam_official)! If you were inspired by us and our suggestions and have recycled some of your old clothes, please share them us and we will feature the best DIYs on our blog! Share the love. 🙂
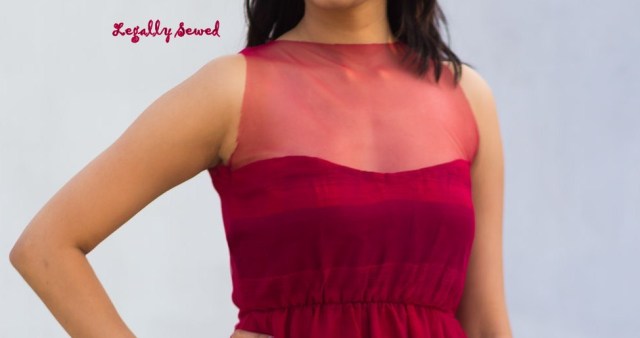
Photo Credits:Sneha Mohanty Photography
#recycledclothesinitiativebylegallysewed #legallysewed #recycledclothes#doyourbitfortheenvironment #reddress

Hi Guys, here’s presenting the lovely knee length handmade A-line FLORAL SKIRT! Yes, it’s up for sale!
When I got this fabric, I had no idea what to make out of it. A few weeks down the line, I took it out again and I just knew what I wanted to make out of this bright and lovely flower print! The cotton material is really soft and so is the white net fabric. I love wearing net and so I really wanted to make something combining my print and net fabrics which will look different and pretty without hiding the bright blue print of the cotton fabric. I finally decided to make this skirt with the net on top and leaving only the print at the bottom. It worked out quite well I think!
Only a small size is available for this but the skirt has an elastic waistband so it can fit waist size 26 to 30 inch easily.
Best paired with: A white collar blouse will look great with this skirt. I didn’t have too many options for a white top at the time so I had to settle with the plain white T-shirt which looks good too but I wanted a while blouse so I could click this skirt with the MATCHING BOW TIE!
Yes, you heard me right. With the cloth that was leftover I made a matching bow tie which can be worn with the skirt or on its own. I hadn’t seen any floral bow ties available on the internet and especially not for women. I decided it was time for women have their own beautiful print bow ties!
I envisioned a fun bold girl going out in the day wearing the skirt, a white collar blouse and the bow tie. Can you imagine how great that will look!? Another option is to make your man wear the matching bow tie the next time you go out. Some men may not agree with the flowery print bowtie but I think it will look good.
I’ll leave you with that thought now. Remember, these items are available for sale and the information is provided below. Not interested in buying? No worries, we would still love to know what you think of this skirt or this bow tie or this combination? Waiting for your feedback. 🙂 And if you do like it, don’t hesitate to share the love! ❤
Sale Information
I am looking for someone who would love to wear it as much as I loved making it. The same design of the skirt can be custom made for you in a print of your choice! Please e-mail at kanikakadam.official@gmail.com to place your order or for any further enquiries.
Presently, we are offering an off season discount of 30%. So this is the perfect time to grab this piece!
Prices for Indian buyers
Skirt: Rs. 1050 (Original price Rs. 1500) + Rs. 100(shipping)
Bow Tie: Rs. 770 (Original price Rs. 1100) + Rs. 100(shipping).
Additional Rs. 150 off if you purchase both items making it Rs. 1670 + Rs. 100(shipping).
Happy Shopping!
A very big thank you to Sneha Mohanty Photography for the lovely pictures of the skirt! She also does baby photography, pre-wedding shoots, engagements etc. Do check out her facebook page and instagram account.

Ever since I started sewing, one of my friends really wanted me to make him a bow tie but I was always too scared to make it. I searched for tutorials online and found a few (Here.. this is the best one i found). It didn’t seem that difficult at first. A few months back I tried to make it but it didn’t work out at all. I realised that the cloth I was using was too thin and fragile and would fray everytime I would try to turn the bow tie inside out. I did a little more research on it and decided to give it another shot. This time it worked! This is how it looks. I’ve made a few more after that. It is true what they say- “Try and try till you succeed“. My friend really likes it so mission accomplished!
After my research on bowties, I have fallen in love with them. They are amazing. Can you believe they have been around since the 17th century! They give a person a classy elegant look and just uplift the entire outfit to a whole new level. The self tie bowtie is the most classy bow tie. You can go for a clip on but it just does not match up to the self tie. You can wear it for any wedding or a party. If you want to spice things up a bit, the men from the groom and/ or the bride’s side can go for same bowties with a funky pattern. The groom’s buddies can also wear bow ties for the bachelor party. There is no end to the occassions where you can carry off this little classic piece!
After I was done making my bow tie I had to learn how to tie it. If you don’t know how to tie it, here you go. Again, it looks so easy but I found it really hard to tie it on me and in the end I finally managed.
Here are a few things I wish i knew or had paid more attention to while making my first bow tie. These may help you along the way if you wish to make your own bowtie.

If you are all ready and excited to make your first bow tie, best of luck! Let me know how it turns out. If you don’t sew, then go and get a bow tie for your next function! Cheers!

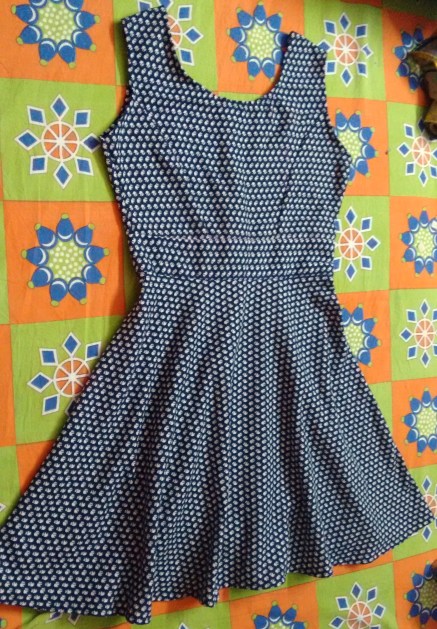
Hi guys! So I have recently made a skater dress. I am extremely happy with the way it has turned out. I know what you might be thinking but no I don’t say that for every project I make! So this is not exactly a tutorial on how to make this dress because I didn’t really take many pictures while making it. This is just a small post on how I went about making this dress. In the process I will share a few pics and give a few tips.
So this is how the dress has turned out. Paired it with boots from New Look and non-branded leggings and sweater. Photography by Aubrey Lyngdoh.
I had been wanting to make a skater dress for sometime and I knew I had to make it once i saw the adorable baby elephant pattern in the market. The cloth is warm so I can wear this dress in winters. Working with this cloth was very easy and it didn’t slip at all!

I started off with cutting pieces for the top first. I always find making skirts easier than making tops. So I had to get the hard part over with first. It always gives me butterflies whenever I start a new project which I have imagined in my head. It takes some time for my brain to process out how to cut the cloth and pin it down to sew in order to get the design I want. Sometimes videos are available on YouTube but not always. So I stop in the middle sometimes to think it over before i start messing around with my fabric. I know I should ideally be doing this before starting my project. Note to self: Do this next time!
These are the pieces I cut out for the front. I used one of my dresses which has similar type of top as I wanted for this dress to trace pieces for my top.
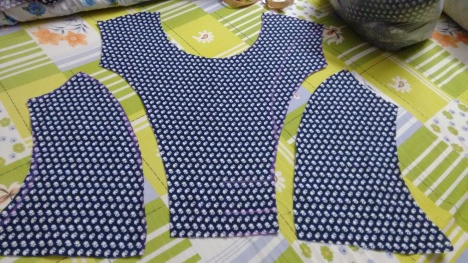
For the front, I stitched the pieces to look like this so it fits properly around the curves.

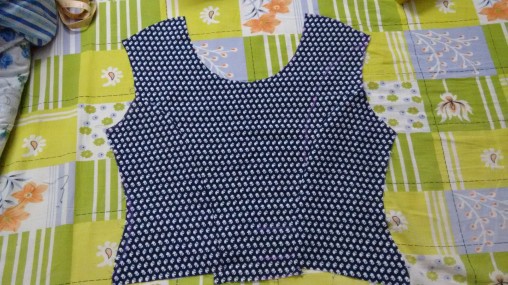
I wanted a zip at the back so there are 2 pieces for the back. Then I attached the back pieces on each side of my completed front piece.
For the skirt part, since this is a skater dress, I made a half circle skirt. There are enough tutorials on YouTube on how to make a half circle skirt. I cut out the piece for my skirt.
I wanted a waistband in my dress so i cut out a waistband of the thickness I wanted long enough to cover my waist. I measured myself to see where I wanted the waistband and stitched the top to the upper part of the waistband first and then the skirt to the bottom part of the waistband. Then I added an invisible zipper at the back, stitched the open end of the skirt and hemmed the bottom and neck and armholes.

Once it was done, I was so happy with it that I celebrated by taking lots and lots of crazy pictures in front of the mirror! There is nothing like the happiness you get when your finished product comes out better than you imagined it!
Hope you enjoyed this post. Would love to hear your comments/ views on this dress. 🙂 Cheers!
I love shorts and once i started sewing I knew I had to learn how to make them! It is so convenient and easy on the pocket. No more going to forever 21 or some other place and paying a bomb for shorts. It is so much fun that now, everytime I make something and have some cloth leftover, I make shorts like these ones.

Ok so lets get started! It is actually quite easy so if you are a beginner, you should definitely try this. Today, I am going to explain the easiest method to make shorts. Once you get a hang of this, you can try different varients like ones with pockets (front, back, side) or ones with waist bands or with zippers.
You will need around 1 metre cloth, scissors, pins, chalk, a pair of shorts you own that fits you well, elastic and ofcourse a sewing machine.
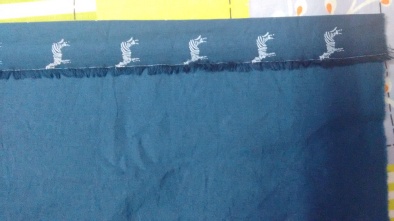
First, lay out your fabric. Be sure to have your selvage line lie on the length. Selvage line is basically the finished edge of the fabric. It will be slightly thicker and may have these threads on the edge (See top end of the picture below).
Fold it in half length wise as shown below. I have taken the left side of the fabric and folded it on the right. So now, the right side of the fabric is open ended.

Fold your shorts and lay them down on the folded edge of the fabric as shown below. Leave some allowance on the top for the waistband depending on the width of the elastic you will be using for the waistband (Keep in mind you will be folding the top twice). I normally keep this at 2 inches. Trace the shape of the shorts using tailer’s chalk adding a 1 inch seam allowance (or howmuch ever seam allowance you are most comfortable with). One important thing to remember is that while tracing the area from the crotch to the waist, do not trace exactly as your shorts are lying down on the fabric. Remember that the elastic in your shorts has gathered the fabric so while tracing from the crotch till the waist, first trace the crotch curve and then instead of tracing diagonally (as your shorts are), trace a straight line upwards.
Another important aspect while tracing the crotch area is to be sure that there is enough curve at the crotch end. If the curve is too less, you will end up with shorts which you can’t wear because they ride up or are too tight in your crotch area. When in doubt, always make the crotch curve a little longer because if it’s too loose, you can still fix it unlike when it is short and you are left with no fabric to fix it.

Once you have traced this piece, cut it out. Now, move downwards on the folded fabric. Use the piece you just cut out as a guide and trace and cut another piece just like it.
You should end up with 2 identical pieces of fabric. Open up both the pieces and lay them down together wrong sides up. (i.e lay out first piece right side up and then lay down the other piece on the first piece wrong side up).


Pin down both the sides from the waist till the crotch to hold the pieces together to sew. Pin from the edge at a distance of what you kept as seam allowance, in my case, 1 inch. DO NOT pin the area from the crotch till the bottom. Pin only from the waist till the crotch. (See below).

Sew along the pin line (taking the pins out as you sew. Do not sew over the pins) using a normal straight stitch. Once done, you can use a zig zag stitch and sew along the seam line to prevent the cloth from fraying. Your edges will look something like this. (Sorry my sewing machine skipped one or two stitched in the zig zag stitch.)

Now that you have sewed the sides together, place your fabric such that the seams fall in the centre. You still have your wrong sides up. Now, properly align and pin the crotch area till the bottom as shown below at a 1 inch seam allowance. Sew a straight stitch along the pinned line and a zig zag stitch on the seam allowance.

You can now try it on and check once if the crotch area is too tight or too loose and fix accordingly. Next, you need to hem the bottom around half an inch.
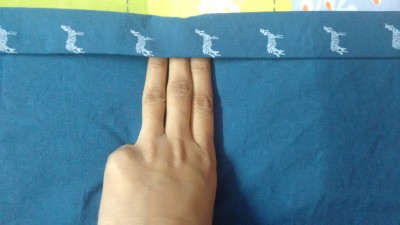
Now, coming to the waist. You are going to fold the top twice thick enough for your elastic to fit inside comfortably.
Folding once….
Folding twice…

Now, sew a straight stitch right on the inside edge of your fold. Sew all around the waist line leaving a spacing of around 3 fingertips right before you reach the end. This is where you will put your elastic in.

Now, take the elastic and place it around your waist (where you want your shorts to sit). Stretch the elastic and cut it out at the point where you think it will be most comfortable. (I usually measure my waist and take an elastic piece which is atleast 3-4 inches smaller than my waist measurement).
Take a safety pin and pin it on one end of the elastic. Insert the safety pin along with the elastic in the waist line through the three fingertip opening you had left earlier. Make sure the other end of the elastic hangs outside the opening. Once both the ends of the elastic are out, overlap the two ends of elastic around half an inch or 1 inch and sew a square on it to secure the two ends of the elastic together. Once this is done, release the elastic such that it sits within the waist line. Now, sew the opening with a straight stitch just like you stitched the rest of the waist line.
TADA! Your shorts are ready! These are the most comfortable pair of shorts that i own! You can wear these to bed or you can wear them to the beach.
Hope this helped! If you have any questions, please leave a comment below and I will get back to you. If you guys liked this tutorial, please don’t forget to like this post and follow our blog and follow us on facebook and instagram. Most importantly, if you do make shorts using this tutorial, we would love to see how they turned out! Cheers!

Photo credits: Sneha Mohanty Photography
HELLO EVERYONE! This is my first post on this blog and i am very excited! As you may have guessed by the title or read the description of this blog, you will know that I am a lawyer cum designer and I am in love with sewing clothes. It is the most satisying thing to be able to make clothes not just for yourself but for others as well. It takes a lot of time and patience and eye for detail to finish one item of clothing but once it’s done, it is an amazing high.
So just to tell you a little bit about what you will see on this blog. The posts on this blog are divided into four categories.
If you like my work, please follow my blog and my official profiles on facebook and instagram. You will find the links on the right side of our blog. For any orders, enquiries, queries, discussions, your recycled clothes pictures etc., please e-mail at kanikakadam.official@gmail.com or legallysewed@gmail.com. Thank you for visiting!
